Your home-office calls have been hit-or-miss for months. Your boss tells you it sounds boxy on Zoom. Your client cuts in with “sorry, can you repeat that?” The voice on your end is fine — it’s what comes out the other side that is the problem. Most DIY soundproofing guides will tell you to double the drywall, add Green Glue, pack four-inch mineral wool. That works for blocking a noisy neighbor, but for voice quality on calls, it is the wrong tool. Radio studios solved this fifty years ago, and the fix is cheaper, faster, and loses less floor space than a full mass build. Here is what fifteen years of plastering and one studio chantier taught me about soundproofing a home-office shared wall.
What other guides miss
Soundproofing and acoustic treatment are not the same job. Soundproofing blocks noise traveling between rooms — your kid screaming next door, the neighbor’s TV. Acoustic treatment controls how sound behaves inside your room — reverb, slap-back, the boxy hollow tone that wrecks voice on calls. Most home-office DIY content lumps both together and prescribes the soundproofing recipe (mass + decoupling + cavity insulation) for problems that are actually acoustic-treatment problems. Result: people spend $800 doubling a wall, the wall sounds dead from the inside, the call quality goes up (because the room sounds less boxy), and they credit the mass build. Half of that gain came from the absorption side of the system. They could have gotten 60% of the result for 20% of the cost.
First, diagnose: is your problem “voice out” or “noise in”?
Before you spend a dollar, sit at your desk and run two tests.
Voice-out test: record yourself on your phone speaking normally at desk position. Listen back. If the recording sounds boxy, echoey, or like you are in a small bathroom — your problem is acoustic treatment. You need absorption.
Noise-in test: have someone make typical neighbor-level noise on the other side of the shared wall (TV at normal volume, normal conversation). Sit at your desk, eyes closed. Can you make out words, just murmur, or hear nothing? If you make out words, your problem is mass blocking. You need a denser wall.
Most home-office problems are 70% voice-out, 30% noise-in. You will usually fix both — but if budget is tight, fix the voice-out side first. Your calls will sound more professional immediately, and that is what your boss notices.
The studio method: fabric-wrapped acoustic panels
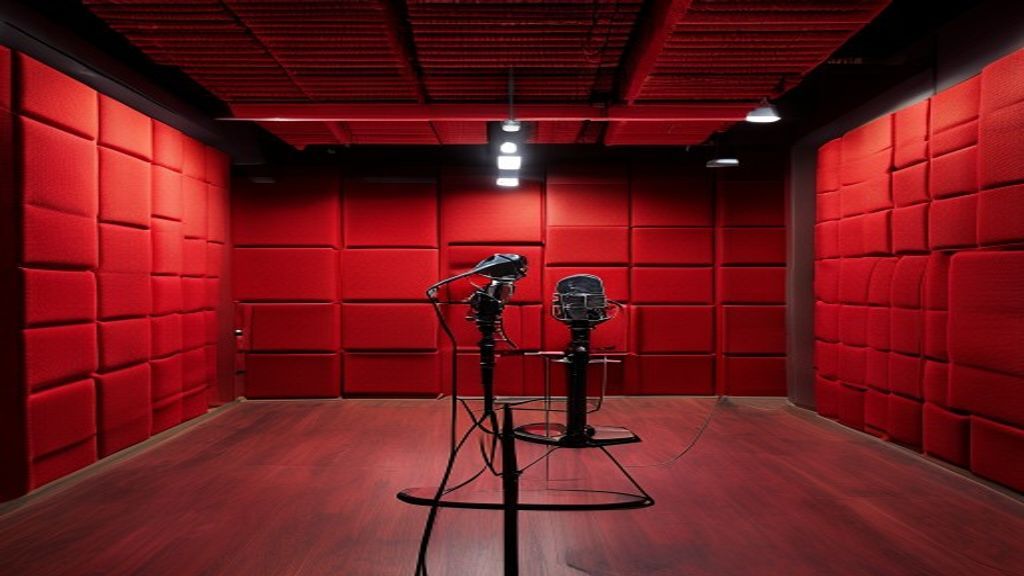
Walk into any local radio station and look at the walls. You will see flat, soft-edged rectangles in fabric — usually a darker color to handle dust and stage lighting. Behind that fabric is either dense rockwool (mineral fiber, like Owens Corning 703) or open-cell acoustic foam. The fabric is acoustically transparent, meaning sound passes through it as if it were not there. The dense core absorbs the sound energy. Slap-back and boxy reverb disappear.
The brand that dominates French broadcast studios is Texaa. Their Aeria and Stereo lines are fabric-wrapped panels glued directly to the wall — no studs, no framing. The fabric comes in a full color range; I installed deep red panels in a local radio station in central France about seven years ago. The full wall behind the host position took maybe four hours, glue cured overnight, and the room was broadcast-ready the next morning. Disclosure: GBH has no commercial relationship with Texaa and is not sponsored by them. I am naming the brand because I actually installed it on a real job.
Texaa is not commonly sold to US consumers, but the technical category is the same and several US brands deliver equivalent performance.
From the job site — local radio station, central France, around 2019
Studio room around 30 square meters. The producer asked me to handle the wall treatment behind the host position because his off-the-shelf foam triangles were making the room sound dead in the wrong way — overdamped high frequencies, untouched low-mid muddiness. I pulled the foam, prepped the wall with a light skim coat to flatten the substrate, and glued Texaa panels in deep red across the host wall and the first half of the adjacent wall. Two coats of construction adhesive per panel, light pressure, painter’s tape to hold the edges overnight. Next morning the producer’s mic test came back: voice tight, no boxy reverb tail, broadcast clean. Material cost was a fraction of what a full demo + decoupled drywall build would have run, and we did not touch the room’s structure. Five years later the panels were still up — that was the last update the producer gave me.
When fabric panels alone are enough (and when they are not)
Panels alone handle the voice-out side. They fix call quality, kill boxy reverb, and make your microphone sound professional. They do not block significant noise coming from the next room.
Panels alone are enough when:
- Your shared wall is a typical residential interior wall (already insulated, single-layer drywall both sides)
- Neighbor or family noise is moderate — you hear it as a low murmur, you do not make out words
- Your main complaint is your own voice on calls, not interruptions
- Floor space is tight (small office, 9 to 12 square meters)
You need to add a mass-build (panel + doubled wall) when:
- The shared wall is old single-layer drywall over an open stud cavity with no insulation
- Noise comes through clearly — you make out words, music has a defined beat
- The shared wall faces a noisy room (kitchen, family living room, neighbor’s home theater)
In the hybrid case, do the wall doubling first, then add fabric panels on top. The panels go directly onto the new drywall — same glue method.
Sizing the treatment: how many panels for a typical home office
For a 10-by-10 foot home office, cover roughly 30% of the wall surface in absorption. Not the whole shared wall — that overdamps the room and your voice goes dead, which is its own problem. Aim for around 4 to 6 panels of 2-by-4 foot dimensions, placed strategically:
- 2 to 3 panels on the shared wall behind your monitor (this is your “first reflection” zone)
- 1 to 2 panels on the wall behind your chair (catches your direct voice bouncing back into the mic)
- 1 panel on the ceiling above your head if reverb is still present (less common need)
The panels behind your monitor matter most. That is the surface your voice hits first when you speak into your mic — kill that reflection and the mic stops picking up the room’s echo signature.
What I look for in a panel (US equivalents to Texaa)
- 2-inch minimum thickness — below that, the panel does not absorb low-mid frequencies where boxy voice tone lives
- Rigid fiberglass or dense rockwool core — open-cell foam absorbs less per inch and dusts over time; mineral fiber stays stable for years
- Acoustically transparent fabric wrap — if the fabric is heavily backed or feels rubbery, sound bounces off it instead of passing through to the core. Lightweight woven fabric (Camira-class) is the standard
- Construction adhesive rated for porous-to-porous bond — the panel core is porous, your drywall is porous, you need a tube-style heavy-duty adhesive that sets in 24h without mechanical fasteners
- Painter’s tape for edge holding — overnight cure works best when the panel edges are pressed flat. Cheap 2-inch tape is plenty
For DIY-wrapping your own panels (rigid mineral fiber board + fabric of your choice), you save around 50% on materials but lose a full Saturday to fabric stretching and wood-frame building. For most home offices, factory-built panels are the right call.
The hybrid build: panel + targeted single-wall doubling
For the cases where you have both a voice-out and a noise-in problem, you do not need to double every wall. Identify which single wall is the dominant path for neighbor or family noise — usually the shared wall directly adjacent to the noise source — and do the full mass build on that wall only. Then add fabric panels on top.
A targeted single-wall hybrid runs around 50 to 60% of a full-room budget and recovers roughly 80% of the perceived benefit. The full mass-build system is covered in our companion guide soundproofing between rooms with drywall — same recipe: decoupled metal frame, perimeter foam, mineral wool cavity, double acoustic drywall, silicone bead. Once it is up and finished, glue your fabric panels directly to the new drywall.
For the product decision on the drywall side — QuietRock single layer vs double standard drywall with Green Glue — see our head-to-head QuietRock vs double drywall comparison.
Cabling, monitor placement, desk position: anticipate before you stick anything
Three details I always check with a home-office client before any glue touches the wall.
Electrical: do you need extra outlets behind the desk for monitor power, dock, lamp, monitor arm? Add them before the panels go up. Once a 2-inch thick panel covers the wall, fishing a new cable behind it means pulling the panel down and starting over. If your office is going to grow (second monitor, standing desk motor, podcast equipment), add at least one extra duplex outlet now.
Monitor arm anchoring: if you plan to wall-mount a monitor on the shared wall, the mount needs to go into the stud, not through the panel. Either place the panel around the mount, or pre-install the monitor arm and panel around it.
Desk position: panels go on the wall your voice hits first. If you might rearrange the desk in six months, that changes which wall is the “first reflection” wall. Lock in the desk layout before you commit to panel placement.
Common rookie mistake to avoid
The classic DIY home-office mistake is buying $300 of foam panels, glueing them everywhere, and being shocked the kid next door is still audible through the wall. Foam absorption does almost nothing to block sound transmission between rooms — it controls reverb inside your room. If you have a noise-in problem and you only install panels, you fixed the symptom you did not have. Run the two-test diagnosis (voice-out, noise-in) before you spend a dollar — they need different fixes, and confusing them is how budgets evaporate. Second classic: overdamping. Covering an entire wall in panels, then the adjacent wall, then the ceiling. The room goes from boxy to dead. Your voice loses presence, the mic sounds flat. 30% coverage on strategic surfaces is the sweet spot.
FAQ — Soundproofing a home office shared wall
Do acoustic panels really reduce noise coming from a shared wall?
Marginal — typically 1 to 3 dB of attenuation, which is below the threshold you can perceive. Acoustic panels are designed to absorb sound bouncing inside a room, not to block sound transmitting through a wall. If your goal is to stop hearing the neighbor’s TV, panels are the wrong tool. They will, however, drastically improve how your own voice sounds on calls — which is the more common home-office complaint.
How much fabric panel coverage does a 10×10 home office need?
Roughly 30% of the wall surface, prioritized on the shared wall behind your monitor and the wall behind your desk chair. That is around 4 to 6 panels of 2-by-4 foot dimensions. Cover much more than that and you risk overdamping — the room goes dead and voice sounds flat through your microphone.
Can I install acoustic panels myself without damaging the wall?
Yes, if you use a removable construction adhesive (or heavy-duty Command strips for thinner panels). The pro method — what I used at the radio station — uses construction adhesive that grabs the drywall paper. To remove, peel the panel and skim-coat over any paper damage with joint compound, then repaint. The wall comes back to neutral with about an hour of patch work.
Texaa vs Auralex vs ATS Acoustics — what is the difference for a home office?
Texaa is the broadcast-pro standard in France and Europe and is not commonly sold in US retail. Auralex and ATS are the US equivalents — both fiberglass or polyester core wrapped in fabric. ATS tends to be cheaper per panel for the same thickness; Auralex has a wider fabric color range. For a home office, performance is functionally equivalent if you match thickness (aim for 2-inch minimum). Pick on price and color, not on brand.
Should I put panels on the shared wall or behind my desk?
Behind your monitor, which is on the shared wall in most home-office layouts. That is where your voice hits the wall first when you speak — the “first reflection” surface. If you only have budget for two panels, both go there. After that, the wall behind your desk chair captures the second reflection.
How long does an acoustic panel install take?
For a typical home office with 4 to 6 panels, count one Saturday morning total: 30 minutes of layout and marking, 90 minutes of glue application and panel placement, then overnight cure with painter’s tape holding edges flat. Day two you peel the tape and you are done. Compare that to a full-system mass build, which is a 2 to 3-day chantier.
Bottom line
Most home-office soundproofing content gets the diagnosis wrong. It treats every shared wall like a noise-blocking problem and prescribes the same mass-build recipe. For voice work — Zoom calls, podcasts, client meetings — the real fix is closer to what radio studios have used for fifty years: fabric-wrapped acoustic panels glued strategically to control reflections. They cost less, install in a morning, lose minimal floor space, and your calls sound professional immediately. If you also have a genuine noise-in problem (clear neighbor voices, family noise audible through the wall), add a targeted single-wall mass build under the panels — but do the panels first. They are the higher-leverage move for the way most people actually use their home office.
For the full mass-build system when you need it: soundproofing between rooms with drywall. For the QuietRock vs double-drywall product decision: our head-to-head comparison.
Jérémy, plasterer-painter, 15 years professional experience in central France.
Get Your Free Home Renovation Checklist
Join 500+ homeowners saving money on their renovations. Free checklist + weekly tips.