
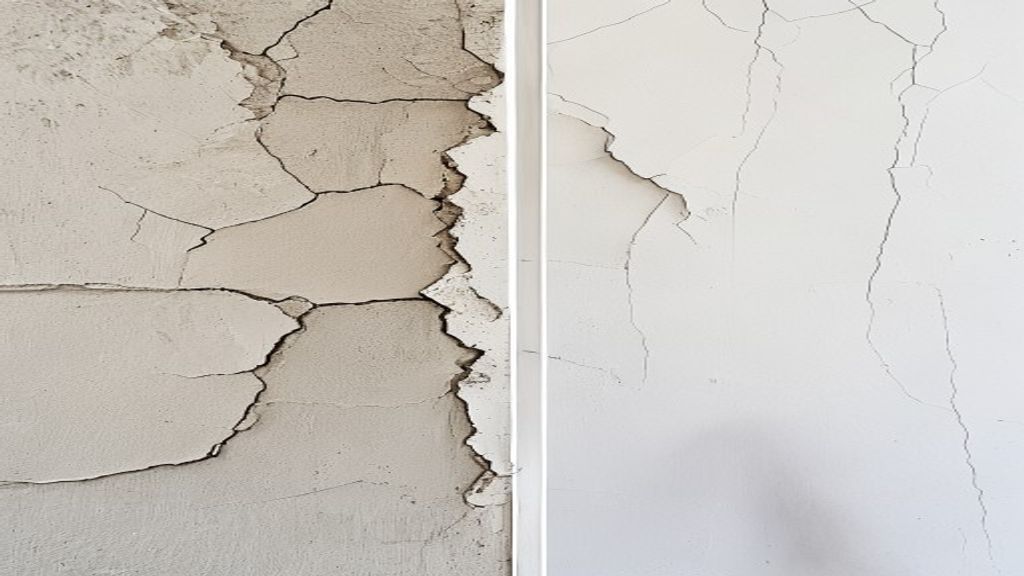
Knowing how to fix drywall cracks before you paint is the difference between a flawless finish and one that shows every imperfection under raking light. I’ve repaired hundreds of drywall surfaces as a plasterer — and I’ll tell you straight: most DIY repairs fail not from lack of skill, but from skipping proper prep or choosing the wrong material for the crack type.
This guide covers every crack scenario you’ll face — from hairline settlement cracks to golf-ball-sized holes — with step-by-step repairs and honest advice on when to call a professional.
Understanding the Types of Drywall Damage
Before you reach for the spackle, identify what you’re dealing with. Different cracks have different causes — and the wrong repair technique will fail within months.
1. Hairline Cracks
Fine surface cracks typically less than 1/16″ wide. Usually caused by minor settlement, seasonal humidity changes, or paint drying and contracting. These are cosmetic and easy to fix.
2. Stress Cracks (Diagonal Corner Cracks)
Cracks running diagonally from door and window corners — typically at 45° angles. Caused by normal house settlement or minor foundation movement. Usually cosmetic but watch for recurring cracks after repair, which indicate ongoing movement.
3. Horizontal Cracks in Walls
Horizontal cracks running along taped seams often indicate tape failure — the paper tape has lifted or the joint compound has failed. Requires removing the old tape and re-taping, not just filling over it.
4. Nail Pops
Circular bumps or depressions where fasteners have worked loose. Very common in older homes with nail-fastened drywall. Easy fix once you understand the correct method.
5. Small Holes (Under 4″)
Cabinet door handle impacts, doorknob punches, minor accidents. Require backing support before patching depending on size.
6. Large Holes (4″ and above)
Require cutting out the damaged section and installing a proper patch with backing. Not significantly harder — just more steps.
🔧 Pro Tip: Run your hand over a repaired wall in daylight with a torch held at a low angle (“raking light”) before you paint. Every bump and hollow becomes visible this way. Professional plasterers always check their work in raking light — do the same and you’ll catch imperfections before the paint does.
Materials You’ll Need
Having the right materials on hand before you start saves multiple trips to the hardware store:
- All-purpose joint compound — for most repairs and final coats
- Setting-type compound (Durabond) — for larger holes needing a strong base coat
- Spackle — for small hairline cracks and nail holes only
- Paper tape and fiberglass mesh tape — paper for joints (stronger), mesh for patches
- Drywall patch kit — self-adhesive mesh patches for small-medium holes
- Drywall screws and a drill — for re-securing nail pops and large patches
- Putty knives: 4″, 6″, 10″ flexible blades
- Sanding sponge and 120-grit sandpaper
- Primer — essential before painting repaired areas
👉 3M Drywall Repair Kit (Amazon)
👉 Red Devil Spackling Compound (Amazon)
👉 DAP Flexible Collins Putty Knife Set (Amazon)
Step-by-Step Repairs by Crack Type
Fixing Hairline Cracks
- Clean the crack: Remove any loose material with a putty knife. Widen the crack slightly with the knife tip — counter-intuitive but it gives the compound something to bond to.
- Apply spackle or joint compound: Use a flexible 4″ knife to press compound firmly into the crack. Feather the edges out 2–3″ on each side.
- First coat — let dry fully: Compound shrinks as it dries. Don’t rush — a damp coat under a dry coat will crack again. Typically 4–6 hours minimum.
- Sand smooth: 120-grit sanding sponge. Wipe dust away with a damp cloth.
- Apply second coat if needed: Most hairlines need 2 coats. Feather wider than the first.
- Sand, prime, paint.
Fixing Nail Pops
- Drive a new drywall screw 2″ above and 2″ below the popped nail. This secures the drywall panel back to the stud.
- Countersink the popped nail with a hammer — drive it below the surface, dimpling the paper without breaking it.
- Apply joint compound over the dimpled holes. 3 thin coats, letting each dry completely.
- Sand smooth and prime.
Fixing Tape Seam Failures
- Cut out the failed tape: Score along the seam and remove all loose tape and compound. Don’t just skim over bubbled tape — it will fail again.
- Apply fresh joint compound: A thin base coat over the bare seam.
- Embed paper tape: Press firmly into wet compound, smoothing out bubbles with your knife. Wipe away excess compound.
- Let dry completely, then apply 2–3 finish coats with a wide (10″) knife, feathering 6–8″ each side of the seam.
- Sand, prime, and paint.
Fixing Small Holes (Under 4″)
- Use a self-adhesive mesh patch: These cover the hole and provide a surface for compound to grip.
- Apply joint compound over the mesh with a 6″ knife. Push compound through the mesh on the first coat.
- 3–4 coats, feathering wider with each coat — a 4″ hole needs compound feathered at least 10″ wide for an invisible repair.
- Sand between coats once dry.
- Prime before painting — unpainted compound is porous and will show through topcoats as a dull patch.
🔧 Pro Tip: Cold, joint compound is your friend. Many DIYers apply too much compound per coat trying to fill the hole in one pass. Thick coats crack and shrink unevenly. Professionals use 3–5 thin coats on larger repairs — each no more than 1/8″ thick. Patience here saves you sanding hours.
Fixing Large Holes (4″ and Above)
- Cut a clean square or rectangle around the damaged area using a drywall saw.
- Install horizontal backing: Cut two pieces of 1×3 wood slightly wider than the opening. Insert through the hole and screw them to the back of the drywall from the front side, top and bottom.
- Cut a drywall patch to fit the opening exactly.
- Screw the patch to the backing pieces.
- Apply fiberglass mesh tape over all four seams.
- Skim coat with setting compound (Durabond) first, then finish with all-purpose compound in 3–4 coats.
- Sand, prime, paint.
👉 USG Sheetrock All-Purpose Joint Compound (Amazon)
Our Renovation Command Center spreadsheet tracks costs, timelines, and materials in one place — so you never go over budget. Used by 200+ homeowners. Get it here →
When to Call a Professional
Most drywall repairs are DIY-friendly — but some situations warrant a professional assessment:
- Recurring cracks in the same location after repair — indicates ongoing structural movement or foundation issues
- Cracks wider than 1/4″ with displacement (one side higher than the other)
- Water-stained drywall — fix the leak source first, then assess whether the drywall needs replacement (wet drywall loses structural integrity)
- Cracks running floor-to-ceiling continuously — potential structural concern requiring a structural engineer, not a plasterer
- Soft or mushy drywall around windows — likely moisture infiltration requiring window resealing
Priming Before Painting: Non-Negotiable
Unpainted joint compound is highly porous and will absorb paint unevenly, creating dull “flashing” visible in certain lighting. Always prime repaired areas with a drywall primer before applying topcoat. For best results, prime the entire wall so the new paint sheen is uniform.
Find the right paint for the job in our room painting guide, or browse our picks in the Home Improvement Guide. If your wall needs a full resurface after repairs, our drywall installation guide covers the complete process.
Frequently Asked Questions
Why do my drywall repairs keep cracking?
The most common causes are: applying compound too thick per coat (it cracks as it shrinks), not letting each coat dry fully before applying the next, or applying over active structural movement. Use thin coats and confirm the cause of the original crack before repairing.
What’s the difference between spackle and joint compound?
Spackle is thick, dries quickly, and is ideal for small nail holes and minor surface chips. Joint compound (mud) is thinner, takes longer to dry, but sands more smoothly and is necessary for larger repairs and tape work. Don’t use spackle for cracks wider than 1/4″ — it’s too brittle.
About the Author: GBH Team brings hands-on experience from years of professional plastering and drywall work. Our guides are built from real job-site knowledge — tested repairs, honest material recommendations, and zero filler advice.
Choosing the Right Joint Compound for Each Repair
Not all joint compound is the same, and choosing the wrong type is a mistake that costs time. Here’s the breakdown:
Lightweight All-Purpose Compound
The go-to for most DIY repairs. Easy to sand, low shrinkage, widely available. Suitable for hairline cracks, nail pops, and small holes up to 4″. Dries in 4–6 hours under normal conditions.
Setting Compound (Hot Mud / Durabond)
Chemically hardening compound — sets in 20 to 90 minutes depending on formulation (Durabond 20, 45, 90 = approximate set time in minutes). Much stronger and harder than premixed compound. Ideal for larger holes requiring a solid base coat, or when you need fast turnaround. Hard to sand — use it for base coats only, finish with all-purpose on top.
Topping Compound
The lightest, smoothest premixed option — designed specifically for final finish coats. Sands beautifully and leaves a fine surface. Not strong enough for base coats or structural repairs, but excellent for final skim coats over repairs that are already filled and stable.
Spackle
Thick, fast-drying paste for very minor repairs: nail holes, tiny surface chips, small cracks under 1/8″ wide. Dries in 1–2 hours, shrinks minimally. Not suitable for larger repairs or tape work — it cracks under stress. Keep a tub for quick touch-ups.
The Role of Tape in Drywall Repair
Paper tape vs. fiberglass mesh tape — the debate is real and both have their place:
Paper Tape
The traditional choice for drywall professionals. Stronger in tension, doesn’t bubble when properly embedded in wet compound, and produces tighter seams. Requires more skill to apply correctly — it must be fully embedded in wet compound with no dry patches beneath it. Use for: seam repairs, re-taping failed joints, corners.
Fiberglass Mesh Tape
Self-adhesive, easier for DIYers, ideal for patching holes. The mesh spans the opening and provides a surface for compound to grip. Less strong than paper in tension and tends to crack at seams under stress if overloaded. Use for: patching holes, areas that don’t flex.
🔧 Pro Tip: When using mesh tape over a hole patch, always use setting compound (Durabond) for the first coat — not premixed compound. Setting compound’s strength compensates for the mesh tape’s relative weakness at the edges. Premixed compound over mesh is fine for finish coats once the base is hard.
Sanding and Surface Preparation for Paint
The prep work between your drywall repair and paint application determines whether your repair is invisible or visible from across the room:
- Sand with 120-grit on a sanding block or sanding sponge after the final coat is fully dry. Work in circular motions, then with the grain.
- Check in raking light: Hold a torch or work light at a very low angle (nearly parallel to the wall). Every imperfection becomes visible. Mark low spots with a pencil — they need an additional thin coat of compound.
- Second sand with 150 or 180-grit after any additional touch-up coats.
- Wipe down with a dry microfiber cloth, then a damp cloth to remove all sanding dust. Let dry completely.
- Apply drywall primer before painting. This is non-negotiable — unprimed compound is porous and will show through your paint topcoat as a dull, flat patch known as “flashing.”
For applying the final paint coats, our room painting guide covers the complete process from primer to finish coat, including brush vs. roller technique for smooth walls.
Preventing Future Drywall Damage
A few habits prevent the most common causes of recurring drywall repairs:
- Install door stops — doorknob holes are entirely preventable
- Use proper drywall anchors for wall hangings — toggle bolts or hollow wall anchors rated for the weight. Never just screw into drywall without a stud or anchor.
- Maintain consistent indoor humidity (40–60%) — extreme seasonal humidity swings cause drywall to expand and contract, leading to settlement cracking in corners and seams
- Address water leaks immediately — wet drywall deteriorates rapidly and loses structural integrity within days of sustained moisture exposure
Once your repairs are smooth and primed, if you need a full wall resurface consider our skim coat guide for a flawless Level 5 finish. For the final painting phase, our best paint sprayers guide can help you choose the right sprayer for the job.
Get Your Free Home Renovation Checklist
Join 500+ homeowners saving money on their renovations. Free checklist + weekly tips.