
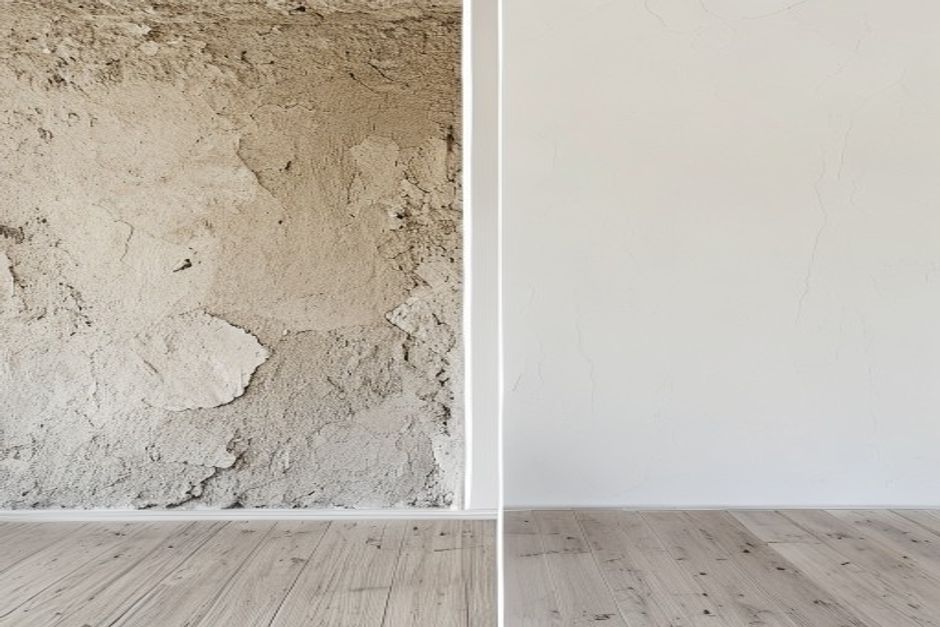
Knowing how to skim coat walls is one of the most valuable plastering skills you can develop — and one of the most misunderstood. A skim coat is a thin layer of joint compound applied to a wall to create a flat, smooth surface. It’s the technique professionals use to save damaged walls that would otherwise need full replacement, and to give new drywall that glass-smooth finish before paint.
I’ve skim coated thousands of square meters over the years. In this guide, I’ll walk you through the complete process — from knowing when you actually need a skim coat, to the two-coat application method, to the sanding and common mistakes I see beginners make every single time.
When Do You Actually Need to Skim Coat?
Not every rough wall needs skim coating. Know when it’s the right tool:
- After wallpaper removal — stripped wallpaper almost always leaves torn paper facing and uneven texture on the drywall surface
- Old textured walls you want smooth — orange peel, knockdown, and popcorn textures that need to be neutralized before painting
- After skim coat failure — previous thin plaster or skim coat that has cracked, bubbled, or delaminated
- New drywall needing a Level 5 finish — the highest drywall finish standard, required for high-sheen paints or critical lighting environments
- Repair areas blending into existing smooth walls — large patches that need to match the surrounding surface perfectly
If your wall just has isolated cracks or holes, skim coating the whole wall is overkill — check our drywall crack repair guide first.
Tools You’ll Need
Having the right tools before you start isn’t optional — the wrong trowel or knife makes this job dramatically harder:
- 10–14″ finishing trowel or drywall knife — the primary application tool. A good flexible stainless steel blade is essential.
- 18–24″ skimming blade (feather finish trowel) — for larger walls, a longer blade lets you cover more area with fewer strokes
- Mud pan or hawk — for holding compound while you work
- Drill with paddle mixer — for mixing compound to correct consistency
- Corner bead and corner trowel — for crisp inside and outside corners
- Sanding pole with 120 and 220-grit screens
- Primer (PVA drywall primer) — critical first step on raw or porous surfaces
👉 Hyde Tools 14″ Drywall Finishing Knife (Amazon)
👉 Marshalltown Mud Pan (Amazon)
👉 USG All-Purpose Joint Compound (Amazon)
Choosing Your Compound
The material you use matters enormously:
Our Renovation Command Center spreadsheet tracks costs, timelines, and materials in one place — so you never go over budget. Used by 200+ homeowners. Get it here →
All-Purpose Joint Compound (Premixed)
The standard choice for skim coating over existing painted or primed surfaces. Creamy, easy to work, sands beautifully. Shrinks as it dries — plan for two coats minimum.
Topping Compound
Lighter, smoother, and less dense than all-purpose — designed specifically for finish coats. Sands even easier and produces a finer surface. My preference for the second coat.
Setting Compound (Durabond)
Chemically sets rather than drying by evaporation — harder, stronger, and doesn’t shrink. Use it as a skim base over highly porous or compromised surfaces, or where you need fast turnaround. Not ideal as a finish coat — difficult to sand.
🔧 Pro Tip: For skim coating, thin your all-purpose compound to a consistency between peanut butter and mayonnaise — thick enough to stay on the wall but thin enough to spread in a thin, even film. Too thick and you’ll fight drag marks. Too thin and it runs. Mix thoroughly and let it rest 5 minutes before using to eliminate air bubbles.
Surface Preparation: The Step Everyone Rushes
Your skim coat is only as good as the surface beneath it. Don’t skip these steps:
- Prime porous or raw surfaces with PVA drywall primer. Unpainted drywall, stripped wallpaper, and bare mud will suck moisture out of your skim coat instantly — causing it to flash-dry before you can smooth it. PVA primer seals the porosity and gives compound the working time it needs.
- Fix all cracks and holes first. Skim coating is for flattening and smoothing — not for structural repairs. Fill and sand before you skim.
- Remove high spots. Texture bumps, dried compound ridges, and old screw dimples need to be sanded or scraped flat before applying the skim coat.
- Clean the surface. Dust, grease, and old paint chips will contaminate your compound and cause delamination. Wipe walls with a damp cloth.
The Two-Coat Skim Coat Method
Two thin coats beats one thick coat every time. Here’s the professional method:
First Coat: The Base Coat
- Load your hawk or mud pan with compound thinned to working consistency.
- Apply a thin layer starting at the top of the wall using your 10–14″ knife held at 30° to the surface. Work in overlapping strokes — left to right, then immediately smooth with vertical passes.
- Keep the coat thin — you’re aiming for 1/16″ to 1/8″ maximum. You should be able to see the wall color through the compound as you apply it.
- Work in manageable sections — 3–4 feet wide — so you can keep a wet edge. Compound that starts drying before you smooth it will drag and leave trowel lines.
- Scrape off excess compound as you go. Hold your knife at a steeper angle on the return stroke to pull away excess and leave a cleaner surface.
- Let dry completely — typically 6–12 hours depending on temperature and humidity. The compound will turn uniformly white when fully dry.
Second Coat: The Finish Coat
- Lightly sand the first coat with 120-grit to knock down any ridges or tool marks. Wipe dust clean.
- Apply a second thin coat perpendicular to the first — if the first coat went left to right, the second goes top to bottom. This cross-pattern fills low spots and evens the surface.
- The second coat should be even thinner — 1/16″ or less. You’re filling, not building.
- Use your longest blade for this coat to bridge any low spots and keep the surface flat.
- Let dry completely.
🔧 Pro Tip: On the final pass of each coat, hold your trowel at a flatter angle (15° or less) and use long, firm, overlapping strokes with light pressure. This “polishing” pass knocks down ridges and trowel lines before they dry. The flatter the angle, the tighter the finish — experienced plasterers finish with almost zero trowel angle.
Sanding
Sanding skim coat is dusty, tedious work — but done right, it’s where the magic happens:
- Start with 120-grit on a sanding pole to knock down high spots and ridges.
- Check in raking light — shine a torch low across the wall to reveal every imperfection.
- Fill any hollows with a final touch-up coat, let dry, re-sand.
- Finish with 220-grit for the smoothest possible surface before priming.
- Wipe away all dust with a dry microfiber cloth, then a lightly damp cloth. Let fully dry.
Dust protection is essential: Drywall dust is fine and pervasive. Wear an N95 respirator, seal off rooms with plastic sheeting, and plan to vacuum the room twice.
Common Mistakes (From a Plasterer’s POV)
Mistake 1: Skipping PVA primer
The most common cause of skim coat failure. On any porous surface, PVA primer is mandatory — not optional. Without it, compound flash-dries and you can’t smooth it before it sets.
Mistake 2: Applying too thick
Thick skim coats crack as they shrink during drying. Two thin coats always outperform one thick one. If your first coat is showing texture through it, that’s fine — that’s what the second coat is for.
Mistake 3: Working wet compound over dry compound
If part of your section has started to set before you’ve smoothed it, don’t wet it back and try to smooth it. Let it dry completely, sand the ridges, and apply a fresh top coat. Rewetting partially dried compound creates a soft, weak layer that will delaminate.
Mistake 4: Not feathering edges
Skim coats need to taper to zero at their edges. A hard edge where the skim coat ends will telegraph through your paint as a ridge. Always feather out 12–18″ beyond the repair area.
Mistake 5: Painting without priming
Fresh skim coat is porous. Painting directly over unprimed compound causes “flashing” — dull, patchy areas that absorb paint differently from the rest of the wall. Always apply a drywall primer coat after sanding.
After Skim Coating: Priming and Painting
Once sanded smooth, apply a coat of PVA drywall primer. Let dry. Then inspect in raking light one final time for any missed spots. Touch up, re-sand if needed, re-prime those spots.
For paint selection, our drywall installation guide covers the finishing sequence end-to-end. If you’re painting the room after skimming, our room painting guide has the prep-to-finish process. And for your complete renovation plan, visit our Home Improvement Guide 2026.
Frequently Asked Questions
How many coats of skim coat do I need?
Two coats is standard for most surfaces. Three coats may be needed for highly textured walls or where you’re achieving a Level 5 finish. The first coat fills the rough surface; the second levels and smooths. Always let each coat dry completely before applying the next.
Can I skim coat over paint?
Yes — over properly cleaned, dull (not glossy) painted surfaces, skim coat will adhere well. Glossy surfaces need light sanding or a bonding primer to give the compound something to grip. Avoid skimming over peeling or flaking paint — remove loose paint first.
How long does skim coating take to dry?
Standard all-purpose joint compound takes 6–12 hours per coat at room temperature (20°C/68°F) with normal humidity. Setting-type compound (Durabond) sets in 20–90 minutes depending on formulation. Higher humidity and lower temperatures extend drying time significantly.
About the Author: GBH Team brings hands-on experience from years of professional plastering and skim coating. These guides reflect real techniques used on real walls — not just theory from a spec sheet.
Finished the skim coat? If you are doing a full room makeover, our paint sprayer guide will help you choose the right tool to apply the topcoat efficiently.
Choosing Between Skim Coating and Full Drywall Replacement
Before committing to a skim coat, confirm the wall is actually worth saving. Here is the honest breakdown:
Skim Coat When:
- The drywall is structurally sound but the surface is damaged, textured, or covered in old wallpaper
- Cracks are superficial and not caused by active structural movement
- The substrate is dry and not water-damaged
Replace the Drywall When:
- The board is soft, mushy, or water-stained (mold risk + structural failure)
- Large sections are crumbling, delaminated, or fire-damaged
- The wall has recurring structural cracks indicating foundation movement — a skim coat will not hold if the wall keeps moving
The Economics of Skim Coating
Skim coating a full wall costs roughly one bag of joint compound and a few hours of labor versus a half-day of drywall installation per panel. For walls with good bones and compromised surfaces, skim coating is almost always the smarter investment — especially for walls you are about to paint anyway.
Final Checklist Before Painting
Before you pick up a brush or roller after skim coating, run through this checklist:
- Inspect in raking light — no ridges, humps, or hollows visible
- Run your hand lightly over the surface — no snags, bumps, or rough patches
- Dust completely removed — a damp microfiber cloth after vacuuming
- PVA drywall primer coat applied and dry
- Any missed spots touched up, sanded, and re-primed
A wall that passes this checklist will take paint like a dream. Gloss and semi-gloss paints in particular are merciless about surface imperfections — a proper skim coat is what makes them work in home settings.
Get Your Free Home Renovation Checklist
Join 500+ homeowners saving money on their renovations. Free checklist + weekly tips.